Invoicing
What types of invoices are there and what are the differences?
|
Invoices are requests for payment sent from a client to a payer. They are visible in the |
|
|
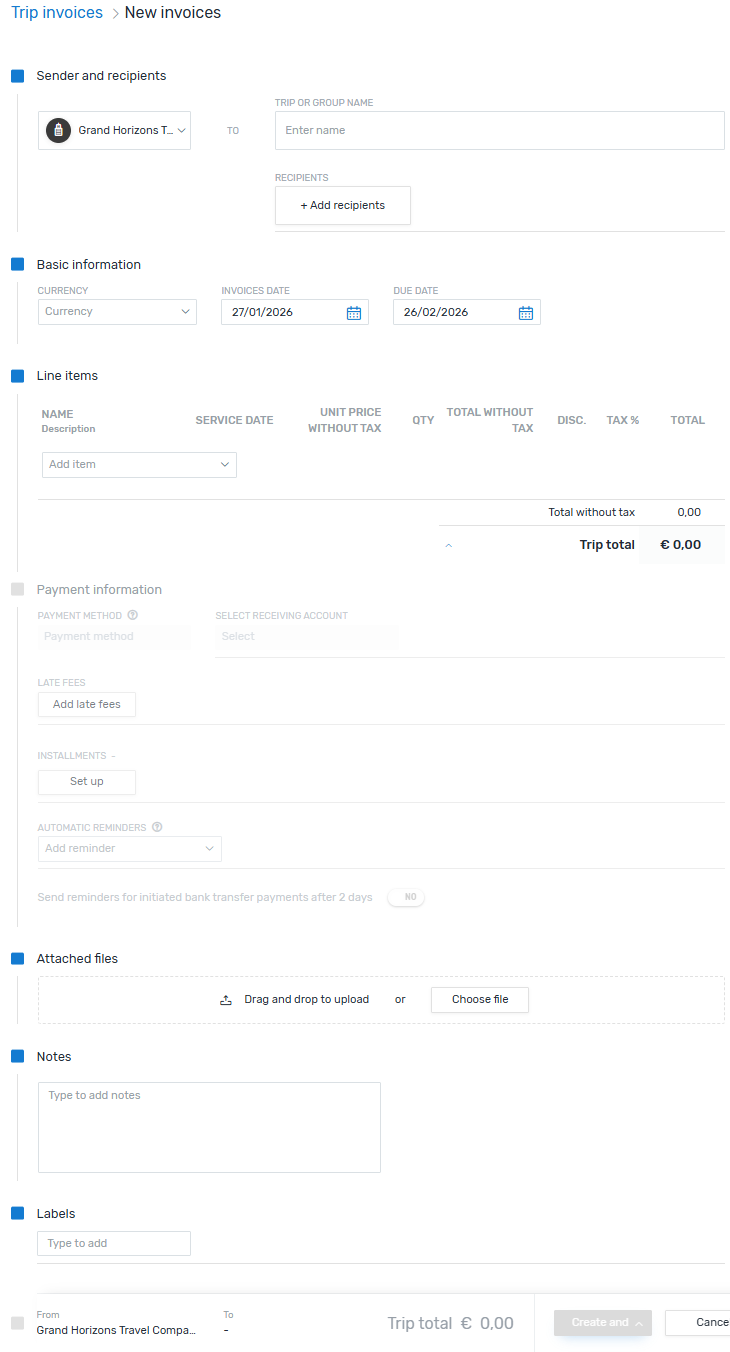
Trip invoices are invoices that are sent to all members of a trip. They allow you to see the cost breakdown of a trip by displaying individual invoices to separate recipients. Additionally, trip invoices display the following fields: InvoiceDate, DueDate, Status, Payment, and Amount. You can also add labels to trip invoices to sort by specific categories. |
|
|
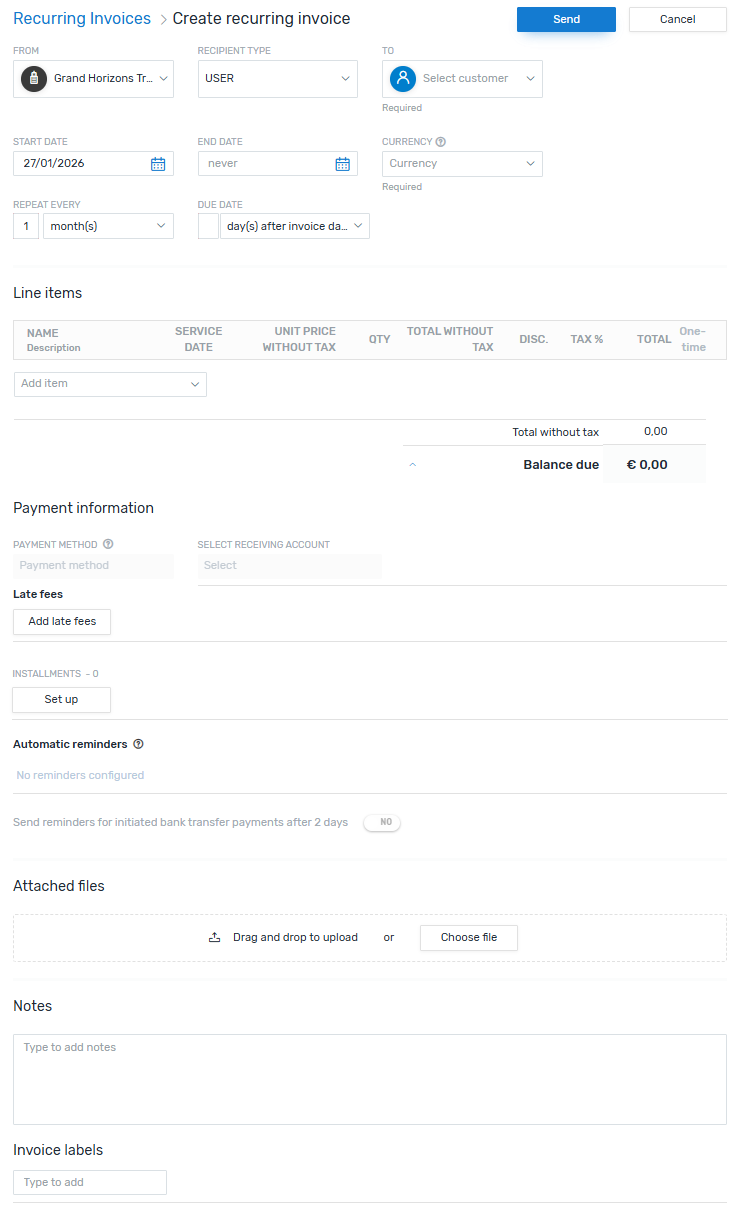
Recurring invoices allow you to send multiple invoices for a trip over a set period of time or repeat invoices at a certain frequency. You can set up automatic reminders to send before the invoice is sent. |
Invoices
Invoice Essentials
Click on an invoice and then click the Payments tab. All associated payments are shown.
Click on an invoice and then click the Refunds tab. All associated refunds are shown.
Once you have opened an invoice, go to the History tab. Here you can see when an invoice was created, sent, seen by the payer, paid, or refunded.
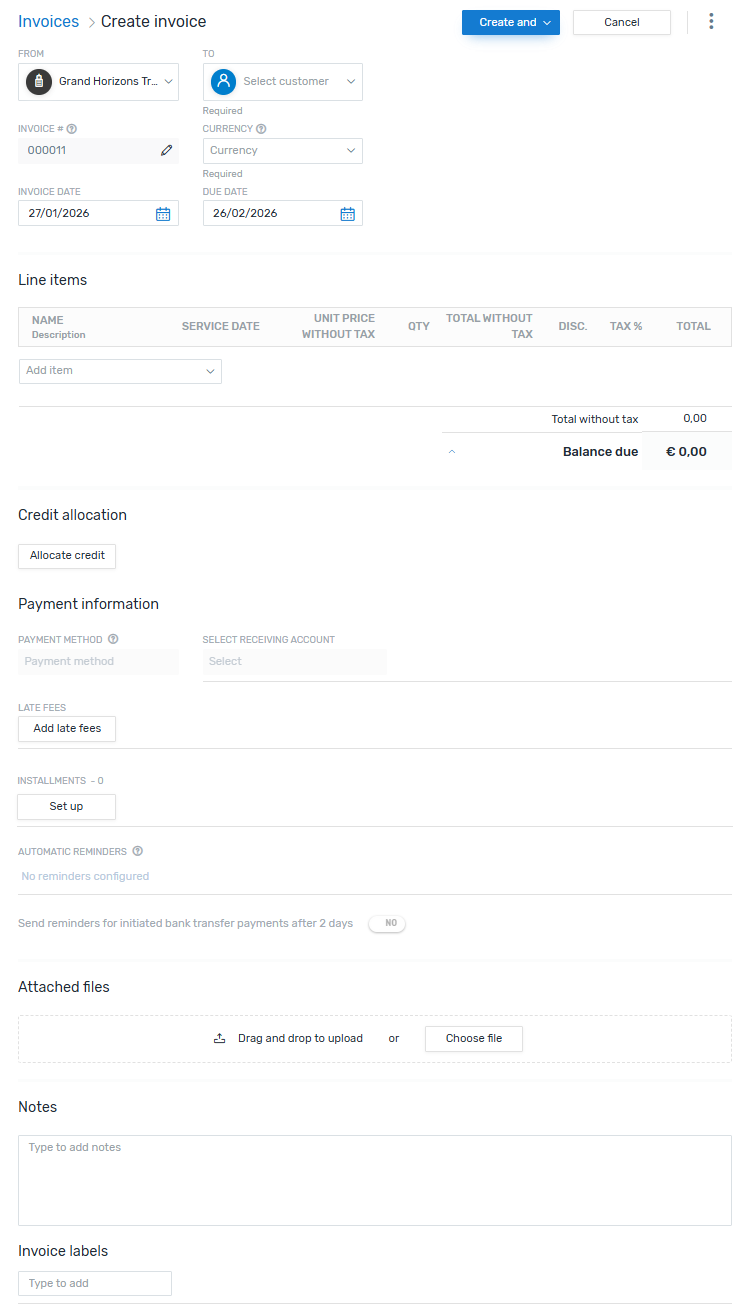
Adding a New Invoice
-
Click Add invoice at the top of the dashboard.
-
Complete the From and To fields.
-
Select a currency.
-
Select an Invoice Date.
-
Select a Due Date.
-
Add the line items for this invoice. You can either use saved line items or create new ones here.
Line items are the individual items that make up an invoice or credit note. Each item consists of at least a name, description and the amount for this item. Line items can be saved and re-used for future invoices and credit notes.
Line Item: 7-Day Guided Alpine Excellence Tour
Amount per unit: 3000 EUR
You can also set a service date or discount when adding line item for this invoice. (If you don't see this option, it has been disabled in the settings.)
 About service dates for line items
The service date lets you specify a time (from - to) for the line item, for example:
Line Item: 7-Day Guided Alpine Excellence Tour
Service Date: May 10, 2026 – May 16, 2026
A service date only applies to the current invoice, not to the re-usable line item. Saving the line item won't store the date, which allows you to set a new date every time you use it.
About discounts
Adding a discount for a line item lets you reduce the cost of the item.
The discount only applies to the current invoice, not to the re-usable line item. Saving the line item won't store the discount, which allows you to set a new discount every time you use it.
-
Click Allocate Credit to select a credit to apply.
-
Select a payment method.
More info about the payment methods
Flywire - Pay now
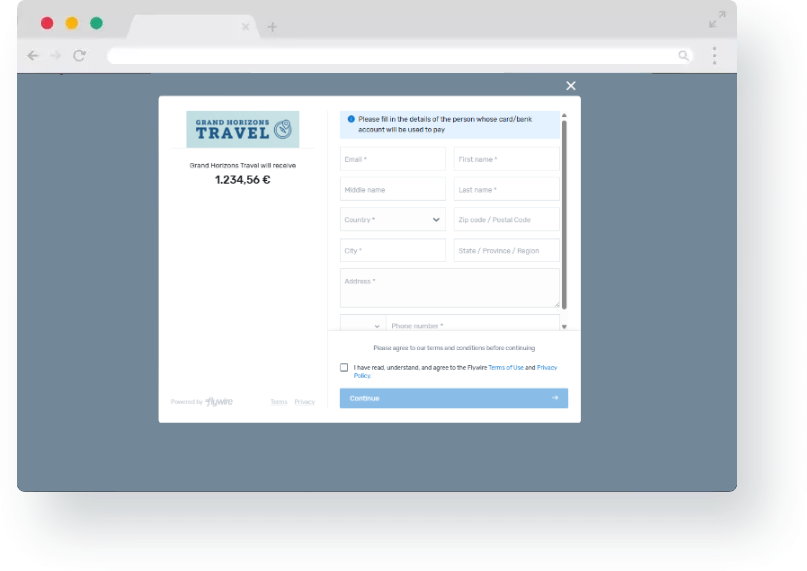
The invoice will contain a link to the Flywire Commercial Payment Experience. In this form, your payer can choose their preferred payment method, for example card or direct debit. Which payment methods are available depends on your settings.
What is the Commercial Payment Experience?
The Commercial Payment Experience is the pop-up form that your customer accesses to make a payment.

Bank transfer
The invoice will contain your bank details so that your customer can pay via the invoice via bank transfer directly to your bank account.
Which bank accounts can be used to pay an invoice?
To enable your customer to pay directly to your bank account, you have to do the following:
-
You have to set up the bank account with Flywire first to make it available in your settings.
-
You have to enable the bank account in your settings.
-
-
Add any necessary late fees.
How do I set up late fees?
Amount Enter either fixed amount or a percentage of the total amount. Type The criteria the late fee will be calculated on (one time, daily, weekly, monthly, or annually) Accruing Dictates how late fees will accumulate (daily, weekly, monthly, or annually). Tax The tax percentage applied only to the accumulated late fees. Waive Fee? Select one of the following:
-
Do not waive
-
Waive for a fixed period
-
Waive indefinitely
-
-
Add installments if needed.
Viewing Invoice Details
The Invoice Details tab shows the due date, currency the invoice was issued in, invoice status, total balance, and installment payment due dates, if any. You can also attach files and copy the invoice link to share.
A trip invoice displays a black label next to the invoice no. indicating that it is a trip invoice. A regular invoice displays nothing.
Invoice Status
You can view the status of an invoice on the right-hand side of the screen. Dates are assigned to the following status items once they are completed:
- Sent (with name of sender)
-
Seen by customer
-
Payment initiated
-
Funds received by Flywire
-
Funds delivered
Exporting Invoices
You can create reports by exporting what you're seeing on the screen in the dashboard.
| Send a ticket via My Support Tickets. |
| Email Flywire [email protected] |
| Go to the Client Resource Center to chat with Flywire. |
-
Go to the page you want to export.
-
Narrow down the list to what you what to include in your report with the search bar and the filters.
You can also export the full list, but the maximum is a list of 5000 entries.How to use filters and the search barHow do I find a specific payment, disbursement, or refund in Flywire Dashboard?How do I find a specific transaction in Flywire Dashboard?You can use the search bar and filters to find what you are looking for. The second sentence above is conditioned out for Travel Dashboard as this needs to be created.
Attaching a Flywire Payment to an Invoice
You can attach Flywire payments to an invoice in the Invoices module.
-
Go to Invoicing > Invoices.
-
Click on the invoice you want to add payment to.
-
Click Attach Flywire payment.
-
Enter a valid payment ID.
If the payment ID is not valid, an error is displayed. -
Click Match.
The payment must have a status of Guaranteed or Delivered in order to match it to an invoice. -
Click Confirm payment.
Trip Invoices
Trip Invoice Essentials
Line items can be created by adding existing items or by creating new ones. The total amount of all line items is displayed in the Total without tax field. The Trip total field displays the total amount of all lines items plus tax.
Bank transfer and the Flywire - Pay now module are both supported.
Adding a New Trip Invoice
-
Click New trip invoice.
-
Complete the sender and recipient information.
-
Select a currency.
-
Select and Invoice Date.
-
Select a Due Date.
-
Add the line items for this invoice. You can either use saved line items or create new ones here.
Line items are the individual items that make up an invoice or credit note. Each item consists of at least a name, description and the amount for this item. Line items can be saved and re-used for future invoices and credit notes.
Line Item: 7-Day Guided Alpine Excellence Tour
Amount per unit: 3000 EUR
You can also set a service date or discount when adding line item for this invoice. (If you don't see this option, it has been disabled in the settings.)
About service dates for line items
The service date lets you specify a time (from - to) for the line item, for example:
Line Item: 7-Day Guided Alpine Excellence Tour
Service Date: May 10, 2026 – May 16, 2026
A service date only applies to the current invoice, not to the re-usable line item. Saving the line item won't store the date, which allows you to set a new date every time you use it.
About discounts
Adding a discount for a line item lets you reduce the cost of the item.
The discount only applies to the current invoice, not to the re-usable line item. Saving the line item won't store the discount, which allows you to set a new discount every time you use it.
-
Select a payment method.
More info about the payment methods
Flywire - Pay now
The invoice will contain a link to the Flywire Commercial Payment Experience. In this form, your payer can choose their preferred payment method, for example card or direct debit. Which payment methods are available depends on your settings.
What is the Commercial Payment Experience?
The Commercial Payment Experience is the pop-up form that your customer accesses to make a payment.
Bank transfer
The invoice will contain your bank details so that your customer can pay via the invoice via bank transfer directly to your bank account.
Which bank accounts can be used to pay an invoice?
To enable your customer to pay directly to your bank account, you have to do the following:
-
You have to set up the bank account with Flywire first to make it available in your settings.
-
You have to enable the bank account in your settings.
-
-
Add any necessary late fees.
How do I set up late fees?
Amount Enter either fixed amount or a percentage of the total amount. Type The criteria the late fee will be calculated on (one time, daily, weekly, monthly, or annually) Accruing Dictates how late fees will accumulate (daily, weekly, monthly, or annually). Tax The tax percentage applied only to the accumulated late fees. Waive Fee? Select one of the following:
-
Do not waive
-
Waive for a fixed period
-
Waive indefinitely
-
-
Add installments if needed.
Invoice installments
You can add installments for the individual invoices that make up the trip invoice.
This breaks down the invoiced amount into equal installments spread across a certain date range.How do installments work?
Example: You can create a payment plan with 6 installments. This gives the payer the option of paying 1/6 of the total amount on the first of each month over a six-month period instead of paying the total amount immediately. -
Create and Send (or Create and Save) the invoice.
Recurring Invoices
Recurring Invoice Essentials
If you have permission to manage recurring invoices, you can turn recurring invoices on or off for your portal using the Settings module.
You can specify the number of installments to be made in a recurring invoice. Within a recurring invoice, click Set up under Installments and use the slider in the popup window to select the appropriate number of installments.
Adding a Recurring Invoice
-
Click Add recurring invoice.
-
Complete the sender and recipient information.
You can set up recurring invoices for specific users or for groups. Select User or Group in the RecipientType drop-down. -
Select a Start and End date.
-
Select a currency.
-
Select a recurrence using Repeat Every and Due Date.
You can select a repeat invoicing schedule of daily, weekly, or monthly on a specific number of days after the invoice date or on a set date of the following month. -
Add the line items for this invoice. You can either use saved line items or create new ones here.
Line items are the individual items that make up an invoice or credit note. Each item consists of at least a name, description and the amount for this item. Line items can be saved and re-used for future invoices and credit notes.
Line Item: 7-Day Guided Alpine Excellence Tour
Amount per unit: 3000 EUR
You can also set a service date or discount when adding line item for this invoice. (If you don't see this option, it has been disabled in the settings.)
About service dates for line items
The service date lets you specify a time (from - to) for the line item, for example:
Line Item: 7-Day Guided Alpine Excellence Tour
Service Date: May 10, 2026 – May 16, 2026
A service date only applies to the current invoice, not to the re-usable line item. Saving the line item won't store the date, which allows you to set a new date every time you use it.
About discounts
Adding a discount for a line item lets you reduce the cost of the item.
The discount only applies to the current invoice, not to the re-usable line item. Saving the line item won't store the discount, which allows you to set a new discount every time you use it.
-
Select a payment method.
More info about the payment methods
Flywire - Pay now
The invoice will contain a link to the Flywire Commercial Payment Experience. In this form, your payer can choose their preferred payment method, for example card or direct debit. Which payment methods are available depends on your settings.
What is the Commercial Payment Experience?
The Commercial Payment Experience is the pop-up form that your customer accesses to make a payment.
Bank transfer
The invoice will contain your bank details so that your customer can pay via the invoice via bank transfer directly to your bank account.
Which bank accounts can be used to pay an invoice?
To enable your customer to pay directly to your bank account, you have to do the following:
-
You have to set up the bank account with Flywire first to make it available in your settings.
-
You have to enable the bank account in your settings.
-
-
Add any necessary late fees.
How do I set up late fees?
Amount Enter either fixed amount or a percentage of the total amount. Type The criteria the late fee will be calculated on (one time, daily, weekly, monthly, or annually) Accruing Dictates how late fees will accumulate (daily, weekly, monthly, or annually). Tax The tax percentage applied only to the accumulated late fees. Waive Fee? Select one of the following:
-
Do not waive
-
Waive for a fixed period
-
Waive indefinitely
-
-
Add installments if needed.
-
Send the recurring invoice.